Download presentation
Presentation is loading. Please wait.

1
統計遺伝勉強会 新ログページ Quick start v2
奈良原

2
統計遺伝の勉強会ログページを moodle に移行しました。
たくさん機能があるのですが、とりあえず、これまでのWiki でやっていたことを、スムーズにこちらに移行できるように、クイックスタートを用意しました。 ご不明点がありましたら、私にご質問ください。

3
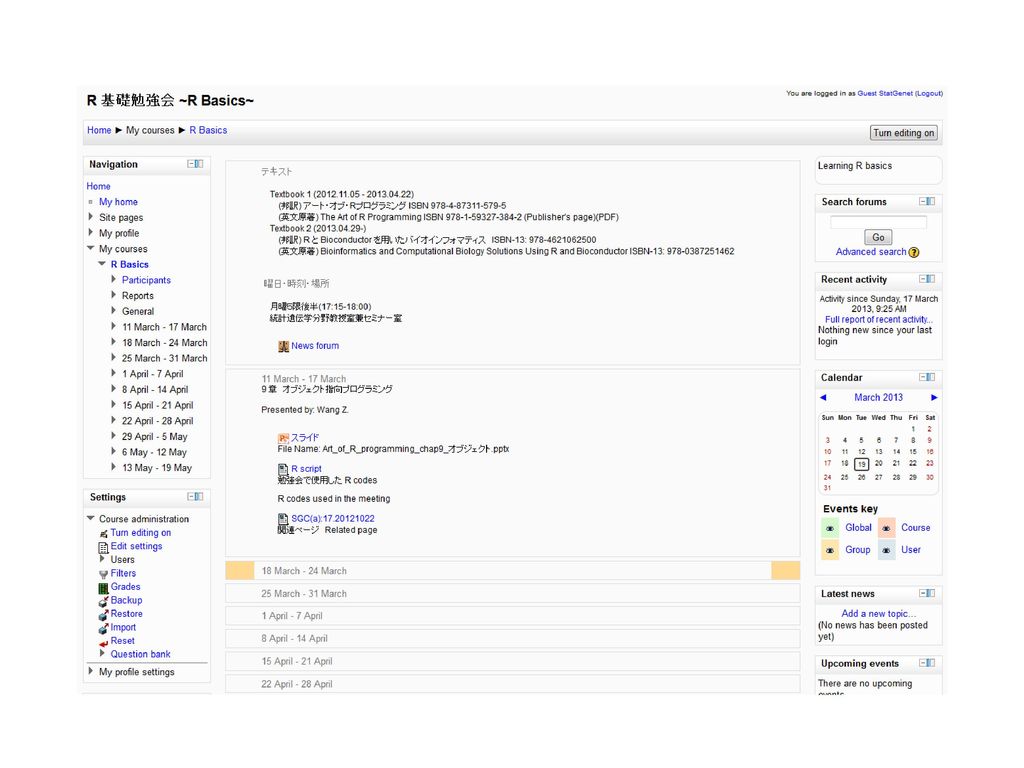
Home

4
各勉強会ページへ To meeting page 例) R 基礎勉強会 e.g.) R Basics
Top page --> Lab Seminars --> R 基礎勉強会 ~R Basics ~

6
サンプルとして、3/11 の分を載せてあります。 Materials for the meeting on 11, March

7
自分の資料を追加するには、ここをクリックして編集モードへ Click this to upload your file

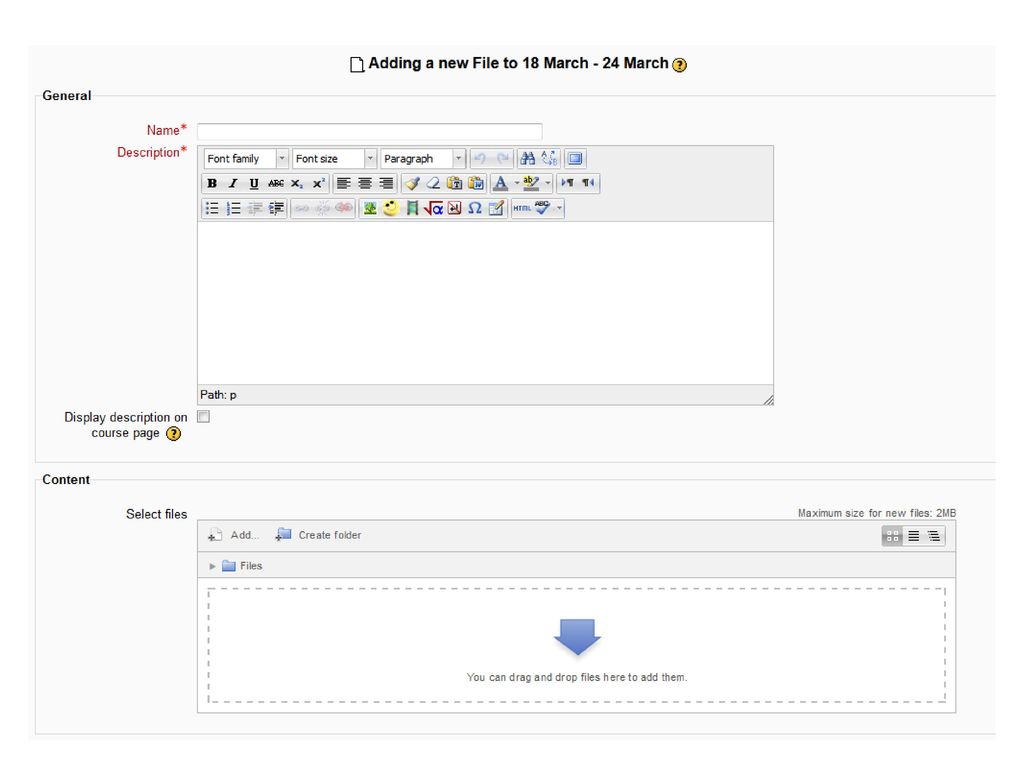
8
編集モード Editing mode 3/18 分の資料を載せるには、18 March - 24 March のところで、"Add an activity or resource" をクリックします。 If you are in charge of the meeting on 18, March, click "Add an activity or resource" in box "18 March - 24 March".

9
いろいろなタイプのコンテンツを追加できるのですが、全部説明するのは大変なので、"File", "URL" だけで十分です。 Here, I describe only "File" and "URL".

10
ファイルを upload する How to upload a file
Fileを選択して "Add" をクリックします。 Choose "File" and click "Add".

12
そのコメントをコースのページで表示するかどうか Check if you want to display "Description"
コンテンツの名前 (ファイル名である必要はない) Name of the item (Any name you like) このコンテンツについてコメント Comment & description そのコメントをコースのページで表示するかどうか Check if you want to display "Description" ここに upload するファイルをドラッグ& ドロップ (複数可とありますが、複数載せない方がよさそうです。複数のファイルがある場合には個別に File コンテンツを作ってください) Drag & drop the file you are uploading. It says that you can upload files, but upload only one file. If you have more to upload, create a File item for each.
 Name of the item. (Any name you like) このコンテンツについてコメント. Comment & description. そのコメントをコースのページで表示するかどうか. Check if you want to display Description ここに upload するファイルをドラッグ& ドロップ (複数可とありますが、複数載せない方がよさそうです。複数のファイルがある場合には個別に File コンテンツを作ってください) Drag & drop the file you are uploading. It says that you can upload files, but upload only one file. If you have more to upload, create a File item for each.")
13
その下の細かい設定は無視して 一番下にある
Click either one of two buttons at the bottom to finish uploading どちらかをクリックするとコンテンツが追加されます。 Save and return to course: save してコースのページに戻る Save and display: save して、そのコンテンツを見る。

14
例:3/11 のスライド ppt Example setting for 11/3 ppt file

15
リンクの貼り方 How to attach a URL
URLを選んで "Add"をクリックします。

16
General field はFile のときと同じ Same as "File" item
リンク先の URL をここに入力 "Choose a link" というボタンもありますが、テキストボックスに直接コピペできます。 Input the URL here. You can simply input the URL into this text box without using the "Choose a link" button.

17
その下の細かい設定は無視して 一番下にある
どちらかをクリックするとコンテンツが追加されます。 Save and return to course: save してコースのページに戻る Save and display: save して、そのコンテンツを見る。

18
+α: "Page" content ファイルで用意した資料ではないが、ちょっと長めの文章 やR のソースコードを載せたいとき、 "Page" コンテンツを使うことができます。 "Page" item might be used to create a web-based page for some note and R code. File や Link の貼り方と基本的には同じようにして追加できます。 Creation of "Page" is similar to File and URL.

19
追加したコンテンツの編集・削除 Editing and deleting created items
編集モードでは、各コンテンツの横に編集・削除関連のアイコンが並んでいます。 タイトルだけ編集 Edit title 追加時とおなじ画面を表示して内容を編集 Edit content 削除 Delete 移動。日付を超えて移動もできます。(例 11 March --> 18 March の field へ) Move. You can move across dates 他はあまり気にしなくていいです。Others may not matter.
 Move. You can move across dates. 他はあまり気にしなくていいです。Others may not matter.")
20
General description この部分はこのアイコン をクリックすることで書き足せます。
この部分はこのアイコン をクリックすることで書き足せます。 To edit this part, click this icon.

22
From here, English slide comes after Japanese one.

23
コースへの参加 自分が登録されているコースを見るには
Navigation --> My home 参加登録してあるコースの一覧と、各コースでの自分の status (宿題の提出状況など), upcoming event などが表示される
, upcoming event などが表示される.")
24
Your courses From Navigation --> My home, you see the list of your courses. You also see your status (such as homework submission) and upcoming events for each course.
 and upcoming events for each course.")
25
コースの参加者に一斉にお知らせする方法1 各コースのトップにはNews Forum というページが要されています。
たとえば R 基礎勉強会では、ここにNews Forum があります。

26
How to send a message to all participants in a course 1
Every course has "News Forum". You can find it at the top of the course page. Messages posted to News Forum will be automaticaly sent to everyone in the course via . For example in the R basic course, you find News Forum here.

27
コースの参加者に一斉にお知らせする方法1 こんな感じで掲示板のようなものです。 Like this, it works like a board. 新しい投稿をするには、 "Add a new topic" をクリックします。 Click "Add a new topic" to post a new message.

28
投稿のタイトル(Subject)、メッセージを編集し、添付ファイルがある場合にはAttachment のbox にファイルを drag & drop します。
Mail now はチェックすれば、即座に(確定後5分以内)メッセージが送信されます。Mail now にチェックをしない場合、確定後 30 分、編集の猶予があります。 完了したら、"Post to forum"をクリックします。 次に表示されるページで "Continue" をクリックして投稿完了です。
メッセージが送信されます。Mail now にチェックをしない場合、確定後 30 分、編集の猶予があります。 完了したら、 Post to forum をクリックします。 次に表示されるページで Continue をクリックして投稿完了です。")
29
Edit title (Subject) and message
Edit title (Subject) and message. You can attach files by drug & drop to the Attachment box below. If you tick "Mail now", the message will be sent to the course members immediately (in 5 min. after confirmation). Otherwise, you have 30 min. to edit/delete the message. Click "Post to forum" then in the next page, click "Continue" to confirm the post.
 and message. You can attach files by drug & drop to the Attachment box below. If you tick Mail now , the message will be sent to the course members immediately (in 5 min. after confirmation). Otherwise, you have 30 min. to edit/delete the message. Click Post to forum then in the next page, click Continue to confirm the post.")
30
Tips "Post to forum"をクリックすると、投稿を決定したことになり、News Forum にはその記事が掲載されます。
ただし、Mail now にチェックをしなければ、投稿内容がメンバーに連絡されるのは 30分後です。 30 分以内に削除すれば、投稿は無効になり、メンバーにメールは送られません。 30分以内に編集すれば、メンバーが受け取るメッセージは編集後の内容になります。 Mail now をチェックしても、実際には最大で 5 分かかることがあります。それまでに、記事を編集・削除したとしても、メンバーが受け取るメールには反映されません。

31
Tips By clicking "Post to forum", your post will appear in News Forum.
But, if you did not check "Mail now", the post will be sent to members 30 min later. If you delete the post within 30 min. the post will be deleted and members will not get the message. If you edit the post within 30 min. members will get the updated version. When you tick "Mail now", it may take 5 min. at longest. Even though you edit/delete the post before the message is sent, members will get the original message.

32
コースの参加者に一斉にお知らせする方法2 各コースページから で参加者のリストが表示される
Navigation --> Courses --> R Basics --> Participants で参加者のリストが表示される

33
How to send a message to all participants in a course 2
From a course page Navigation --> Courses --> R Basics --> Participants You see the list of participants in the course.

34
リストの下の "Select all" をクリック
リストの右端にチェックが入る "Select all" の右にある "Choose..." と書いた listboxから "Send a message" を選択 選択すると、メッセージ作成画面に移行 メッセージを作成したら、 "Preview" --> "Send message"

35
Click "Select all" Checkboxes at the right will be checked. Choose "Send a message" from the listbox (right to "Select all") It brings you to a message composing page When you finished, click "Preview" --> "Send message".

36
注意 メッセージ作成欄は HTML 数式など書けるかのようになっていますが、テストしたところ、メッセージを受け取った側では、うまく表示されないようです。通常の単純なテキストメッセージだと思ってください。 ファイルの添付についてですが、メッセージそのものにファイルを添付する機能はありません。Moodle のコースページに uploadしておいて、そのリンクを張る(次ページ参照)ことで対応できます。
ことで対応できます。")
37
Tips Message is composed using HTML format, and it seems that you can write in a rich format (such as mathematical expression), but it will not be displayed for receivers. You cannot attach files to message. A solution is uploading files to the course page, then attach the link to the file to the message (see the next slide for how to).
, but it will not be displayed for receivers. You cannot attach files to message. A solution is uploading files to the course page, then attach the link to the file to the message (see the next slide for how to).")
38
moodle file のリンクの貼り方 1. Link が欲しいファイル名を右クリック
2. 右クリックメニューから、"Copy Link Location" で clipboard にコピーする。 3.リンクのタイトルにしたい文字列を選択すると、リンクツールが activeになる。 4. Insert/edit link をクリックすると下のWindow が立ち上がる。 5. Link URL に先ほどコピーしたファイルのアドレスをペーストして、Insert で挿入。 リンクタイトルが必要なければ直に URL をコピペでももちろんいいです。

39
How to inset a link to file on moodle
1. Right-click a file name. 2. Choose "Copy Link Location" from the right-click menu to copy the link to clipboard. 3. Selecting characters will activate link tools. 4. Clicking "Insert/edit link" opens a window below. 5. Paste the link that you has just copied to "Link URL". You can just copy & paste the link to the text if you do not need to display title of the link.

40
Assignment: 宿題 コースのコンテンツに表示される は宿題マークです。 コースの参加者の方は提出しましょう。
コースのコンテンツに表示される は宿題マークです。 コースの参加者の方は提出しましょう。 例:統計論文勉強会 3/25 宿題

41
Assignment This sign means homework/assignment
Please submit your answer Example:Stat Journal Club 3/25 Assignment

42
宿題タイトルをクリックすると宿題の詳細が表示されます
内容 宿題の general information あなたのこの宿題に関するステータス 締切日時 ここをクリックすると回答作成画面に移動します

43
By clicking the assignment title, detail is shown.
内容 宿題の general information あなたのこの宿題に関するステータス Due date Click this button to compose your submission

44
ここに回答を書き込みます ファイルを添付したい場合にはここに Drag & drop 完了したらここをクリック

45
Write your answer here To attach a file, drag & drop here Click this when finished

46
"Save changes" を押すと submission status が変わります
提出した内容を変更したい場合はここをクリックして編集することができます。

47
By clicking "Save changes", your submission status will change.
When you want to update your submission, click here. (Editing may not be available depending on the setting of the assignment.)
")
48
Assignment notification の設定
現在、他の人の Assignment submission/update のお知らせが全員に送られるという状況で、このお知らせがとてもうるさいと思います。 宿題をだした人だけにお知らせするようにする方法が見つからないので、以下の方法で、お知らせメールの設定をオフにしてください。 左端にある My profile setting --> Messaging --> Assignment notifications のチェックをすべて外す。

49
Setting assignment notification off
Currently, notification about assignment submission/update of others is sent to everyone. This must be annoying. I cannot find how to avoid this, while enabling notification to a person who created the assignment. So please set the notification off following below. My profile setting (at the left pane) --> Messaging --> Uncheck all boxes under "Assignment notifications"
 --> Messaging --> Uncheck all boxes under Assignment notifications")
Similar presentations


 ~てください。 (= Please do…) ~ています。 (= am/is/are doing…) Connecting.>")
 ・たてがき / 縦書き (from right to.>")

 2012/10/20 E07>")


5--Invitation>")


をおぼえよう!>")


